在CentOS 6上安装JBoss 7.1
Install JBoss 7.1 on CentOS 6
This post will cover installing JBoss 7.1.1 on CentOS 6.x.
We’ll also set up JBoss to run as a service, as well as set up access to the management console
Finally, we will look at how run JBoss on port 80 or, alternatively, placing JBoss behind Apache.
In this post, we will set up the JBoss 7.1.1 in Standalone mode. In a subsequent post we will look at setting up JBoss 7.1.1 in Domain mode.
Step 1: Install the Java 6 or 7
Firstly, we will need to install Java.
JBoss 7.1.1 will work with JDK 6 or JDK 7.
I’m using JDK 7, update 5.
You can download the JDK here: http://www.oracle.com/technetwork/java/javase/downloads/index.html
The instructions below will also work with JDK 6, you just need to change the file names accordingly.
Start by creating a directory /usr/java.
[root@dev2 ~]# mkdir /usr/java
```Download jdk-7u5-linux-x64.tar.gz (or latest) and save to /usr/java directory you created above.
[root@dev2 java]# ls
jdk-7u5-linux-x64.tar.gz
[root@dev2 java]# tar -zxf jdk-7u5-linux-x64.tar.gz
[root@dev2 java]# ls
jdk1.7.0_05 jdk-7u5-linux-x64.tar.gz
[root@dev2 java]# cd jdk1.7.0_05
[root@dev2 jdk1.7.0_05]# pwd
/usr/java/jdk1.7.0_05
[root@dev2 ~]#cd /usr/java
[root@dev2 java]# sh /opt/jdk-6u33-linux-x64.bin
Change to the /usr/share directory: [root@dev2 jdk1.7.0_05]# cd /usr/share
[root@dev2 share]# wget http://download.jboss.org/jbossas/7.1/jboss-as-7.1.1.Final/jboss-as-7.1.1.Final.zip
[root@dev2 share]# unzip -q jboss-as-7.1.1.Final.zip
[root@dev2 share]# mv jboss-as-7.1.1.Final jboss-as
[root@dev2 share]# cd jboss-as
[root@dev2 jboss-as]# pwd
/usr/share/jboss-as
Since we will want to run JBoss as a non-root user with minimal privileges, we'll create a user, jboss, who will own the JBoss files and JBoss will run under his account.
To do this, do the following.
Create a new group, jboss, and then create the user jboss and add the user to the jboss group.
[root@dev2 share]# groupadd jboss
[root@dev2 share]# useradd -s /bin/bash -g jboss jboss
[root@dev2 share]# chown -Rf jboss.jboss /usr/share/jboss-as/
Now, we need to put Java into the path of the users jboss and root (as well as any other users you like)
The JAVA_HOME is where we installed the JDK above: /usr/java/jdk1.7.0_05
Add the following to the .bash_profile of the user jboss and the user root:
JAVA_HOME=/usr/java/jdk1.7.0_05
export JAVA_HOME
PATH=$JAVA_HOME/bin:$PATH
export PATH
[root@dev2 ~]# . ~/.bash_profile
[root@dev2 ~]# java -version
java version “1.7.0_05”
Java(TM) SE Runtime Environment (build 1.7.0_05-b06)
Java HotSpot(TM) 64-Bit Server VM (build 23.1-b03, mixed mode)
[root@dev2 ~]#
Finally, switch to the user jboss and issue 'java -version' to verify that Java is now in the path of user jboss. [root@dev2 ~]# su - jboss
[jboss@dev2 ~]$ java -version
java version “1.7.0_05”
Java(TM) SE Runtime Environment (build 1.7.0_05-b06)
Java HotSpot(TM) 64-Bit Server VM (build 23.1-b03, mixed mode)
[jboss@dev2 ~]$
To create our JBoss script, we will copy the jboss-as-standalone.sh script located under /usr/share/jboss-as/bin/init.d
As root, copy jboss-as-standalone.sh to /etc/init.d and rename it jboss
.
[root@dev2 ~]# cd /usr/share/jboss-as/bin/init.d
[root@dev2 bin]# cp jboss-as-standalone.sh /etc/init.d/jboss
The first was to change line #5 below from it's original '# chkconfig: - 80 20' to '# chkconfig: 234 80 20' The second was to set the JBOSS_USER.
To set the JBOSS_USER, add the following lines to script:
JBOSS_USER=jboss
export JBOSS_USER
#!/bin/sh
JBoss standalone control script
chkconfig: 234 80 20
description: JBoss AS Standalone
processname: standalone
pidfile: /var/run/jboss-as/jboss-as-standalone.pid
config: /etc/jboss-as/jboss-as.conf
Source function library.
. /etc/init.d/functions
Load Java configuration.
[ -r /etc/java/java.conf ] && . /etc/java/java.conf
export JAVA_HOME
JBOSS_USER=jboss
export JBOSS_USER
Load JBoss AS init.d configuration.
if [ -z “$JBOSS_CONF” ]; then
JBOSS_CONF="/etc/jboss-as/jboss-as.conf"
fi
[ -r “$JBOSS_CONF” ] && . “${JBOSS_CONF}”
Set defaults.
if [ -z “$JBOSS_HOME” ]; then
JBOSS_HOME=/usr/share/jboss-as
fi
export JBOSS_HOME
To run JBoss as a service and enable start up at boot, make the script we created above executable and add it to our chkconfig so it starts at boot. [root@dev2 init.d]# chmod 755 jboss
[root@dev2 init.d]# chkconfig –add jboss
[root@dev2 init.d]# chkconfig –level 234 jboss on
Start JBoss (JBoss can take some time to start, but it is faster than JBoss 6).: [root@dev2 init.d]# service jboss start
Starting jboss-as: [ OK ]
[root@dev2 init.d]#
[root@dev2 init.d]# service jboss stop
Stopping jboss-as: *** JBossAS process (25794) received TERM signal ***
[ OK ]
By default, JBoss 7.1.1 is bound to the loopback IP of 127.0.0.1, so if we want to make it available on the web, we need to change this.
Locate standalone.xml under /usr/share/jboss-as/standalone/configuration/.
Open standalone.xml in vi or a text editor and look for the public interfaces node as shown below.
To make JBoss publicly accessible, change 127.0.0.1 to either 0.0.0.0 to allow access on all interfaces or to your public IP.
So, for example, if your public IP is 173.194.35.177, you would change it as so:
Again, if you wish to have JBoss publicly accessible on all interfaces, use 0.0.0.0 in place of your IP above.
Save your changes, start up JBoss, and check it is publicly accessible via http://yourIP:8080
[root@dev2 init.d]# service jboss start
Starting jboss-as: [ OK ]
Woo-hoo! JBoss 7:

JBoss 7.1.1 Welcome Page
**Step 8: Accessing the JBoss 7 Admin Console and adding a Management User**
If you try to access the JBoss Admin Console via the link on the home page (or by going directly to http://YourIP:9990, you will be greeted with the following:
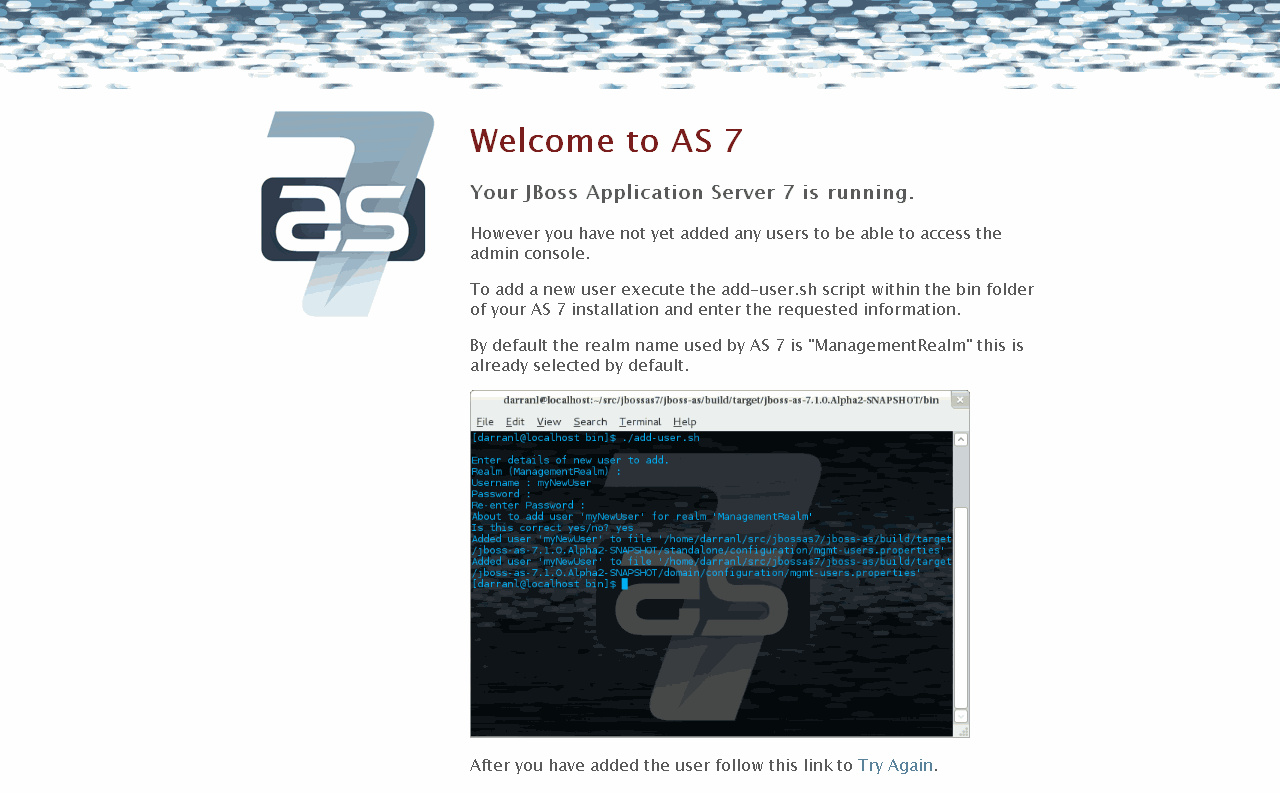
java -jar
While the error page tells you how to add a user, you will also need to update the standalone.xml as we did earlier if you want to allow access over your public IP.
Let's start with adding a Management user as shown on the error page:
As root, navigate to /usr/share/jboss-as/bin [root@dev2 etc]# cd /usr/share/jboss-as/bin
Issue './add-user.sh' to run the script to add a Management user. Follow the prompts. Some defaults are provided. [root@dev2 bin]# ./add-user.sh
What type of user do you wish to add?
a) Management User (mgmt-users.properties)
b) Application User (application-users.properties)
(a):
Enter the details of the new user to add.
Realm (ManagementRealm) :
Username : david
Password :
Re-enter Password :
About to add user ‘david’ for realm ‘ManagementRealm’
Is this correct yes/no? yes
Added user ‘david’ to file ‘/usr/share/jboss-as/standalone/configuration/mgmt-users.properties’
Added user ‘david’ to file ‘/usr/share/jboss-as/domain/configuration/mgmt-users.properties’
[root@dev2 bin]#
While you can now access the Admin console on localhost (127.0.0.1), if you want to access it publicly, we need to update standalone.xml under /usr/share/jboss-as/standalone/configuration/ as we did earlier in Step 7.
Open standalone.xml in vi or a text editor and look for the management interface node as shown below.
To make the JBoss Admin console publicly accessible, change 127.0.0.1 to your your public IP or to 0.0.0.0 for all interfaces.
So, for example, if your public IP is 173.194.35.177, you would change it as so:
Again, if you wish to have the Admin console publicly accessible on all interfaces, use 0.0.0.0 in place of your IP above.
Retstart JBoss to reload the the change to standalone.xml:
[root@dev2 init.d]# service jboss stop
Stopping jboss-as: *** JBossAS process (25794) received TERM signal ***
                                                           [  OK  ]
[root@dev2 init.d]# service jboss start
Starting jboss-as:                                         [  OK  ]
Now, navigate back to http://YourIP:9990 and you should be prompted for the Management user credentials you just created:

JBoss 7 Management User Log In
Below, we are now logged in to the Admin console as the Management user we created:

JBoss 7 Admin Console
Step 9 (Optional): Running JBoss on Port 80.
To run services below port 1024 as user other than root, you can use port forwarding.
You can do this by adding the following to your IP tables:
[root@sv2 ~]# iptables -t nat -A PREROUTING -p tcp -m tcp --dport 80 -j REDIRECT --to-ports 8080
[root@sv2 ~]# iptables -t nat -A PREROUTING -p udp -m udp --dport 80 -j REDIRECT --to-ports 8080
Be sure to save and restart your IP Tables.
Step 10 (Optional): Putting Apache in Front of JBoss.
As an alternative to running JBoss on port 80, if you have Apache in front of JBoss, you can use mod_proxy as well as ajp connector to map your domain to your JBoss applications using an Apache vhost as shown below:
While both Tomcat and JBoss have improved their standalone performance, I still prefer to have Apace in front for a number of reasons.
Note that when using proxy, if you will be proxy to localhost (which you should be), you will need to set your public interface bind address to either 0.0.0.0 (for all interfaces) or to 127.0.0.1 for localhost only.
 ServerAdmin [email protected]
    ServerName domain.com
    ServerAlias www.domain.com


    ProxyRequests Off
    ProxyPreserveHost On

       Order allow,deny
       Allow from all


    ProxyPass / http://localhost:8080/
    ProxyPassReverse / http://localhost:8080/


    ErrorLog logs/domain.com-error_log
    CustomLog logs/domain.com-access_log common
Alternatively, with the AJP connector enabled, you can use ajp as well:
 ServerAdmin [email protected]
    ServerName domain.com
    ServerAlias www.domain.com


    ProxyRequests Off
    ProxyPreserveHost On

       Order allow,deny
       Allow from all


    ProxyPass / ajp://localhost:8009/
    ProxyPassReverse / ajp://localhost:8009/


    ErrorLog logs/domain.com-error_log
    CustomLog logs/domain.com-access_log common
The AJP connector is NOT enabled by default. To enable the AJP connector:
- Log into the Admin console
- Click Profile on the top right.
- On the left menu, go to Web > Servlet/HTTP.
- Click on the “add” button at right.

JBoss 7.1.1 Profile
- Enter the following in the Create Connector dialogue box as shown below.
- Click Save.

JBoss 7.1.1 Welcome Page
The AJP connector is now enabled.

JBoss 7.1.1 AJP Connector
One final note above the vhost examples above (proxy and ajp).
In both vhost examples above, we are “mapping” the domain to the root.
If we wish to map to an application such as domain.com/myapp, we can add some rewrite as shown below.
This will rewrite all requests for domain.com to domain.com/myapp.
 ServerAdmin [email protected]
    ServerName domain.com
    ServerAlias www.domain.com

    RewriteEngine On
    RewriteRule ^/$ myapp/ [R=301]


    ProxyRequests Off
    ProxyPreserveHost On

       Order allow,deny
       Allow from all


    ProxyPass / ajp://localhost:8009/
    ProxyPassReverse / ajp://localhost:8009/


    ErrorLog logs/domain.com-error_log
CustomLog logs/domain.com-access_log common via:http://www.davidghedini.com/pg/entry/install_jboss_7_on_centos